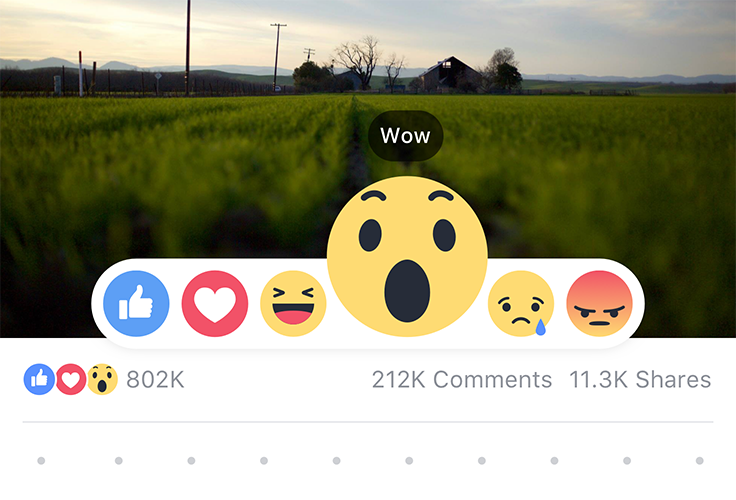
Reactions are a way for people to more easily express themselves on Facebook. As we began building the feature, we wanted to provide a high-quality experience that felt fun at every step, including how the Reactions were displayed, how they moved on the screen when people interacted with them, and how they were dismissed.

We knew that we wanted the images representing each Reaction to be animated, which presented a challenging problem. We wanted the animations to be high quality, small enough not to affect performance, and able to scale to different sizes without sacrificing either of those goals. We explored existing image and animation formats, but each solution came with trade-offs in our design requirements.
This led us to develop Keyframes, a library that is able to export and play back After Effects animations while addressing the specific set of constraints we faced. Since the first iteration, we’ve learned more about developing animations, worked to improve the library, and applied it to other products at Facebook. Today, we’re excited to open-source and share this library more broadly, so that others can work together to build more delightful products.
The challenge
We wanted to find an image format that we could use to play back animations, with several constraints in mind:
- Resizability: Reactions would be displayed at different sizes, growing or shrinking accordingly as a person hovered over a particular Reaction in the dock. This meant we should avoid static image formats such as PNG since they don’t scale perfectly upwards and downwards and can leave artifacts or blurry edges.

- Quality: We wanted to preserve as accurately as possible the details in how the different parts of each Reaction moved — particularly for the faces since these details made them seem lifelike. We also wanted to play back the animations at a high frame rate (60 fps) on high-end devices and ensure that the faces would render smoothly on mobile.

- File size: Displaying multiple Reactions at different sizes, high frame rates, and high resolution would result in rather large file sizes. Reading each of the files from disk into memory would be time consuming, while holding the files in memory would take up space on the device. However, we didn’t want to compress the images, since that would degrade their quality.
Existing solutions
We started by exploring different existing solutions to better understand what others with similar challenges had come up with, and which of them would be best to handle as many of our constraints as possible.
Initially, we looked at common static image formats such as PNG sequences and GIFs, as well as even more compressed formats like WebP. It quickly became clear that these wouldn't work without drastically simplifying the animations for file size, and that we'd have to accept the drawback of static images not scaling up or down very well.
Wanting the scaled image to look sharp led us to another format called SVG, a vector-based graphic. Unlike a static image, which is described as colors for specific pixels, an SVG is described as a list of drawing commands that enables a renderer to draw back an image correctly at any given size. Another advantage was that some browsers supported animating SVGs through SMIL or CSS. However, SMIL has only partial support on certain browsers, and using CSS meant we had to build a way to parse and interpret many of the features supported by CSS animations into native Android and iOS.
Next we explored some custom solutions. The team found inspiration from bodymovin, a library that converts an Adobe After Effects composition into metadata, which can then be rendered back using a JavaScript library. While this approach is creative, it supports a much larger set of features that we didn’t need and was less performant on mobile. We only needed a few simple shapes and transforms, and could discard a lot of the metadata that was available in the file.
Introducing Keyframes
By this point, we knew that we wanted a vector-based image that included simple animation data to be rendered back on the client. The challenge was now in understanding what was in each After Effects composition and how we could extract only the data that we needed.
We started with some tools that enabled us to dump out all of the contents of the composition model into a massive JSON file. We started to explore each of the files and understand how the animations were being built, starting with the simplest Reaction, Love, and working our way up to the more complicated ones.
We soon began to understand the concepts necessary to build back each of the Reactions animations. Each Reaction included a number of composition layers, but the data behind each layer could be lumped into two major categories — shapes, which describe the visible features of a Reaction, and animations, which describe how each of these shapes can change over time.
The most basic information that we pulled out was a path object, a part of the shape layer composed of a series of vector commands for drawing back a line at any size. Each of these paths corresponded to a different feature on each of the Reactions.
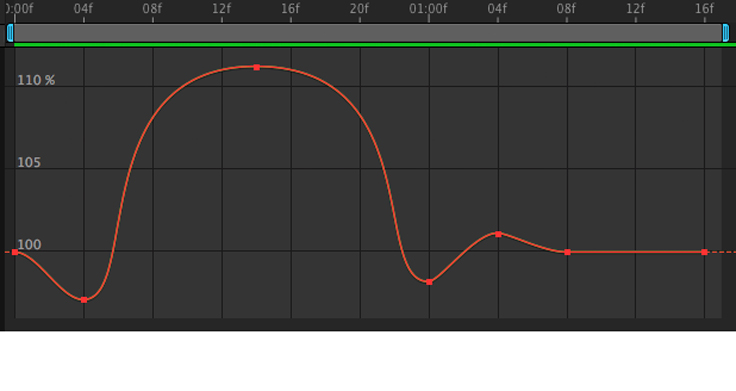
The animations were a bit more complex to extract. A core part of animations are keyframes, which identify important timings in an animation when we want to lock in to a certain value. For example, in the graph of the scale of the Love heart, we have a keyframe at frame 4 where we want to hit a scale value of 97%. In addition to these key timings, there was additional data, using in and out tangents, describing exactly how the value transitioned from one keyframe to the next. These animations, composed of keyframes and transitions, could be a part of the shape layer, describing how a specific feature changes over time, or be a layer on their own, which can be referenced by various shapes to coordinate multiple features moving together.

With these tools, we were able to build a library that rendered images from a JSON file using Core Animation on iOS along with Paths and Matrices in the graphics library on Android. The JSON file only needed the minimal, necessary data and was mostly composed of arrays of numbers, which compresses really well, too. The format allows both vectors and transformation data, allowing us to correctly play back an animation in real time at any size, as well as have fine control over the progression and speed of the animation. For example, a shape layer from the Keyframes logo, describing a shape appearing from frames 19 through 31 and transforms from a starting vector line to a final vector line, looks like this in the extracted JSON:
{
  "name": "Animated Line",
  "from_frame": 19,
  "to_frame": 31,
  "key_frames": [
    {
      "start_frame": 19,
      "data": [
        "M951.18,654.82", "L960.00,663.63", "L1083.63,540.00",
        "L960.00,416.37", "L954.18,422.18"
      ]
    },
    {
      "start_frame": 31,
      "data": [
        "M974.19,545.57", "L974.62,546.00", "L980.62,540.00",
        "L974.62,534.00", "L974.34,534.28"
      ]
    }
  ],
  "timing_curves": [
    [
      [
        0.5, 0
      ],
      [
        0.916666666665, 1
      ]
    ]
  ],
  "stroke_color": "#ff1c56c8",
  "stroke_width": 90
}
Other applications and future plans
Since we initially shipped Keyframes with the Reactions product earlier this year, we’ve made a lot of improvements to clean up the library and improve the performance of rendering the images. A few teams have explored other usages of Keyframes, including driving particle effects or leveraging the fine-grained control we have over the animation’s playback. As we use the library and learn what designers want out of a tool like this, we also hope to expand on the different tools and capabilities of After Effects supported by the Keyframes library.

To learn more about the Keyframes library and contribute to the project, visit https://github.com/facebookincubator/Keyframes.


